Your Vacation Photos Suck: Here's How The Pros Do It
Picture this: You're on vacation in some exotic locale, exploring vibrant cultures and taking in the exciting sights and sounds of this new place. You're now standing in front of a beautiful, world-renowned building (the Eiffel Tower, the Taj Mahal, or Angkor Wat), and you whip out your phone to take a shot. You set everything up perfectly: Your phone's brightness slider indicates that the exposure is fine, the horizon line shows you that the photo is straight, and your subject is centered in the frame. You snap the pic, confident you'll come away with a stunning, professional-looking shot. Then, you look at your phone's screen, and the photo is just ... meh. You can't pinpoint what's wrong — but it just doesn't pop, it's not special, and it doesn't look anything like you imagined it would. You don't want to admit it, but you finally face the truth: Your vacation photo sucks. But why?
There are a few possible answers to this question. Firstly, you may need to upgrade what you're shooting on. Photographers always say, "It isn't the camera that makes the photo — it's the person." While there is some truth to that, professional photographers typically aren't capturing National Geographic-quality pics on a $50 point-and-shoot.
However, more importantly, you're probably not "seeing" the way a photographer does. But that can change. This article will offer tips from the pros, as well as from my own experience in travel photography, to help you improve your images without an expensive equipment upgrade. The good news is that it's possible to create excellent travel photos with only your smartphone — plus, the technology is always improving. So, with a decent phone camera and by incorporating the following tips, you'll turn your boring vacation snaps into memorable travel images that you'll feel proud to share.
Lighting is your best friend
One of my former photography teachers told me, "You're not photographing a scene; you're photographing light." This may sound counterintuitive, but it's true. If you're reviewing your current travel photos, and you notice that the colors are muted, there are harsh shadows across people's faces, and the overall scene appears washed out, the culprit is likely the lighting. Typically, shooting in bright daylight creates these kinds of bland images.
Michael Borowski, associate professor of photography at Virginia Tech's School of Visual Arts, shares this tip with VT News: "Photography comes from Greek words for 'drawing with light.' Our eyes adjust easily to different lighting conditions, but the camera has a limited dynamic range ... pay attention to the direction of light. Light coming from an angle is very flattering. That's why many photographers like to work close to sunset or 'golden hour.'" Of course, if you're on a tour with a specific schedule, it may not be possible to wait around for sunset. But you can look for areas of shade that might make for more flattering lighting. Or, wait for moments when the sun ducks behind the clouds to capture a less harshly lit scene.
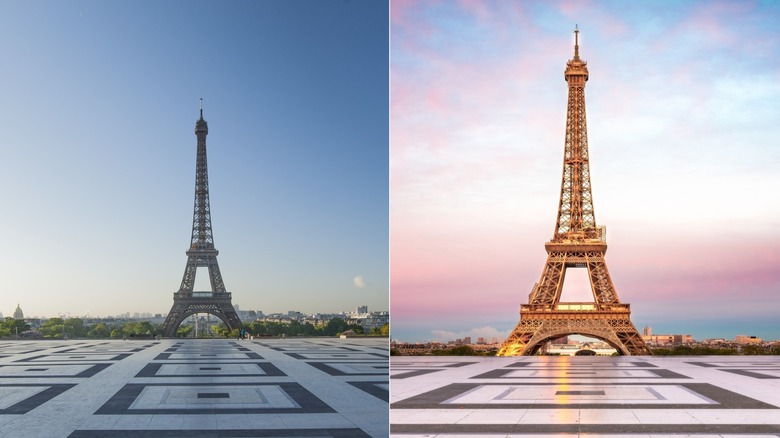
Look at the photos above. On the left, you'll see a perfectly acceptable image of the Eiffel Tower — but there's nothing special about it. Meanwhile, the one on the right is much more spectacular. They were both shot from the same location, but the latter was captured at sunset with the sky beautifully transformed in shades of pink, orange, and blue, giving the structure an alluring golden glow that makes it pop (sidenote: if you're planning to check out the Eiffel Tower, this is the best time of day to visit). So when shooting, always be aware of light — it's your best friend for creating outstanding images.
Know your subject and frame it with intention
Are you guilty of this common beginner mistake? You see an incredible landscape in front of you, so without any thought, you pick up your phone and snap a pic of the whole scene. If you've ever done this before, you've probably forgotten a crucial thing: choosing your subject. Who or what exactly are you trying to capture? Great photographs have a compelling subject. This doesn't necessarily have to be a person. A subject can be a building, an animal, a flower, a crowd, or even an interesting light pattern — something that is the focus of your image and attracts the viewer's eye. Before you take your photo, understand what your subject is — if you don't know, your viewers certainly won't know either!
How you frame your subject is equally as important and should be intentional. As portrait photographer Kyle Cong advises on his blog, "To create the feeling of something being spacious and vast, leave plenty of room around your subject ... To create the feeling of something being confined, put your subject right beside something that represents obstruction."
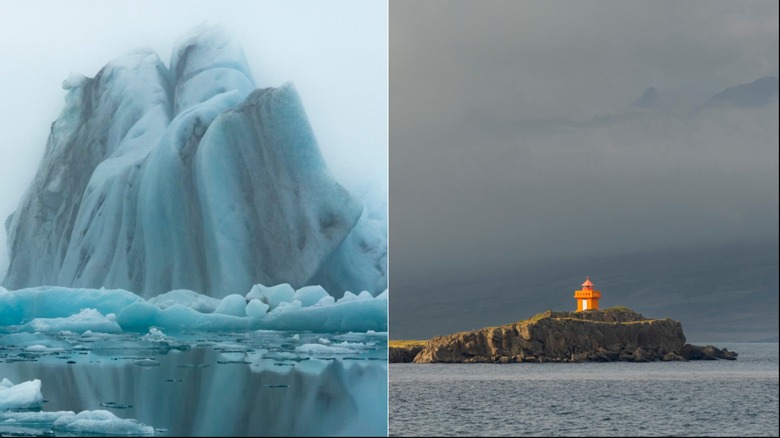
Look at the two photos above, both taken on my trip to Iceland. The left-hand image is from the Jökulsárlón glacier lagoon. This particular electric-blue iceberg caught my attention, so I chose to make this the subject, filling the frame with it and drawing the viewer close to its textures and colors. The right-hand image is the Æðarstein Lighthouse in the Eastfjords. I wanted to showcase this small but mighty orange structure in the vastness of the Icelandic hills and ocean surrounding it, so I chose to give it more breathing room. Before you snap away, always look for your subject first and be intentional with your framing.
Compose creatively: look for leading lines and consider different angles
Composition refers to how you lay out your picture. There are some well-known guidelines that you may be familiar with, including the rule of thirds, where you place your subject in the left or right third of your frame to create a more visually pleasing image. If you're new to composition, one technique to try is using leading lines. They could be fences, roads, or train tracks that go through your image and toward your subject, and they help direct the viewers' focus to the most important element in your picture.
Another technique to explore is changing angles. Constantly taking photos from eye level will become dull, so consider shooting from above or below your subject. A high-angle image, for example, can make your subject look smaller or more vulnerable, while a low-angle image can convey power and confidence. Photographer Nicholas Goodden writes on his website: "Lowering the angle at which you shoot is one of the easiest and most effective ways to produce exciting, sometimes more dynamic shots. It presents a fresh perspective to the viewer otherwise used to seeing the world from a human perspective / height."
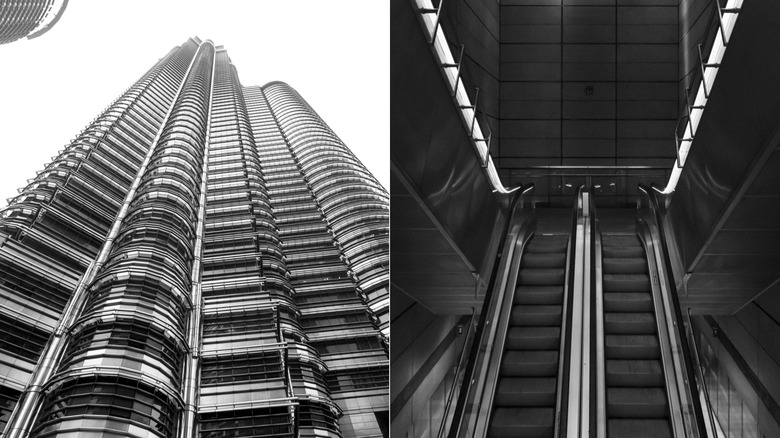
Look at the two photos above. On the left, the steel columns of the Petronas Twin Towers in Kuala Lumpur direct the viewers' eyes upwards, where the tower disappears into the fog. I chose a low-angle, close-up composition to offer a different perspective on this famous attraction. On the right, simple escalators at Christianhavn station in the Copenhagen Metro are the subject of this high-contrast image. The lines of the hand-railings also lead the viewers' eye up towards the light. As you compose your pictures, look for ways to create drama and dynamism through leading lines and different angles.
Tell a story
Photographer Alan Ranger defines visual storytelling on his website as "crafting a photo story that conveys a narrative, evokes emotions, and engages the viewer on a deeper level." Telling a story is key to producing a compelling and meaningful photograph. This involves all of the aforementioned tips, like knowing your subject and composing creatively — but you also need to understand the purpose behind your photograph. Why this person or this site, and why this particular framing?
Often, good storytelling involves a human element. If you're at Angkor Wat at sunrise, you'll certainly want an image of the magnificent temples in the soft, early-morning light. But maybe take a step back and include the hordes of tourists all trying to get the same shot. This can tell an interesting story about overtourism and travel in the modern day that goes beyond the beauty of the temples. Or, if you're traveling with the kids, look for moments: Capture your child laughing on a merry-go-round, staring up in wonder as snow falls, or building a sandcastle on the beach. These unplanned reactions and emotions will make for more interesting travel images than just a collection of buildings and landscapes — and they are likely to be the moments that made your trip special and memorable.
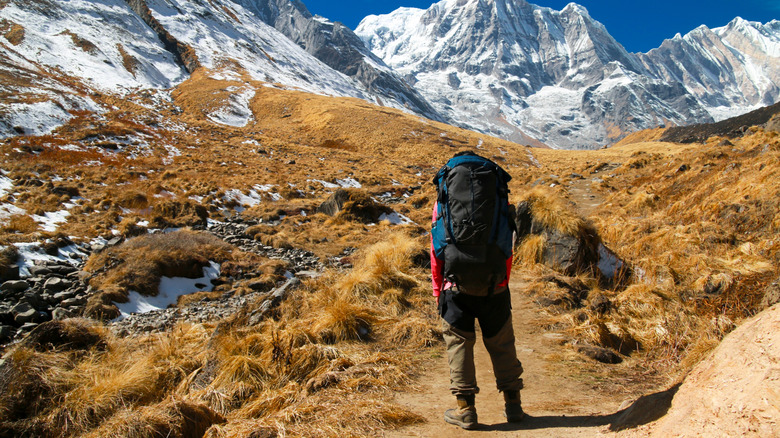
The image above was taken along the Annapurna Base Camp trail in Nepal. It was the day my guide and I reached the actual camp, and along the way, he stopped to admire the striking beauty of the Himalayas before us. I have many photos of the landscape devoid of humans, of course, but this moment stood out to me — it tells a story of how small we are in this magnificent natural environment and how we sometimes need to stand still to appreciate it all.
Remember the three Ps: planning, preparation, and patience
Beyond perfecting camera techniques, you'll need the three Ps if you want that perfect shot: planning, preparation, and patience. The first two involve doing research beforehand. Find out what time and days the attraction you'd like to photograph is open. Check the weather in advance — a pending rainstorm may mean postponing your visit. Figure out if a place is likely to be overcrowded before you plan to go. These are some signs to look out for before booking to see if a place suffers from overtourism. Patience, on the other hand, involves understanding what you want to capture and waiting for that element to appear. Travel photographer Julien Capmeil tells Coveteur, "As opposed to just hastily grabbing something, you need to be patient; wait for the light or for someone to actually walk into a frame."
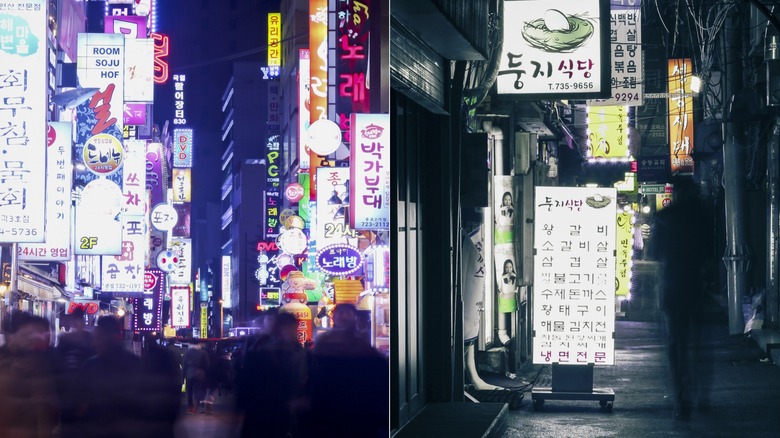
The photos above were both taken in Seoul at night and involved oodles of patience. For the left-hand image, I waited until the street filled up enough to create what I call "ghosties" at the bottom of the frame (actual term: motion blur). For the right-hand image, I wanted just one person to walk through to create a spooky atmosphere in this nearly deserted alleyway. Finally, one lone pedestrian came along and gave me this haunting scene.
Here are some last tips to keep in mind: Respect people's rights and the culture you're in. Don't take close-up photos of people without their permission. Also, make sure you know of any restrictions before you snap away. Photography may be against the rules at some popular tourist attractions, like the Sistine Chapel. Finally, don't get discouraged — you'll be surprised at how quickly you can improve your skills and create truly breathtaking photos with time and consistent practice.